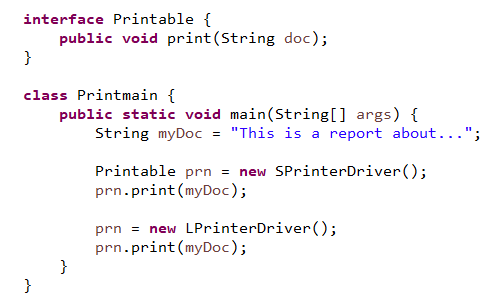
1. 아래를 참고하여 SPrinterDriver 와 LPrinterDriver를 작성하시오. **필수 꼭 외우기**
· 참고
· 작성
class SPrinterDriver implements Printable {
    @Override
    public void print(String doc) {
        System.out.println("From Samsung printer");
        System.out.println(doc);
    }
}
class LPrinterDriver implements Printable {
@Override
public void print(String doc) {
System.out.println("Rfom LG printer");
System.out.println(doc);
}
}
2. 다음 Stack interface를 상속받아 실수를 저장하는 StringStack 클래스를 구현하라. **필수**
· 참고
· 작성
|
1
2
3
4
5
6
7
8
9
10
11
12
13
14
15
16
17
18
19
20
21
22
23
24
25
26
|
class StringStack implements Stack {
private String stack[];
private int top; // top은 index와 같은 의미.
StringStack(int length) {
stack = new String[length];
top = -1; // 0도 상관은 없음.
}
@Override
public int length() {
return stack.length;
}
@Override
public String pop() {
if (top == -1) // 한개도 없다는 의미, 즉 꺼낼게 없다.
return "스택이 비어있습니다.";
return stack[top--]; // 꺼냈으니 줄여야하므로.
}
@Override
public boolean push(String val) {
if (top == stack.length - 1) // 꽉 찼다 라는 의미
return false;
stack[++top] = val;
return true;
}
}
|
cs |
|
1
2
3
4
5
6
7
8
9
10
11
12
13
14
15
16
17
18
19
20
21
22
23
24
25
26
27
28
|
class StackApp{
public static void main(String[] args) {
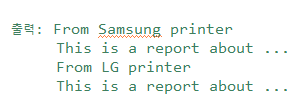
Scanner sc = new Scanner(System.in);
System.out.println("총 스택 저장 공간의 크기 입력>>");
int num = sc.nextInt();
StringStack stack = new StringStack(num);
while(true) {
System.out.println("문자열 입력>> ");
String word = sc.next();
if(word.equals("그만"))
break;
if(!stack.push(word)) {
System.out.println("스택이 꽉 차서 푸시 불가");
break;
}
}
System.out.print("스택에 저장된 모든 문자열 팝 : ");
int len = stack.length();
for(int i = 0; i<len; i++) {
String s = stack.pop();
System.out.print(s + " ");
}
sc.close();
}
}
|
cs |
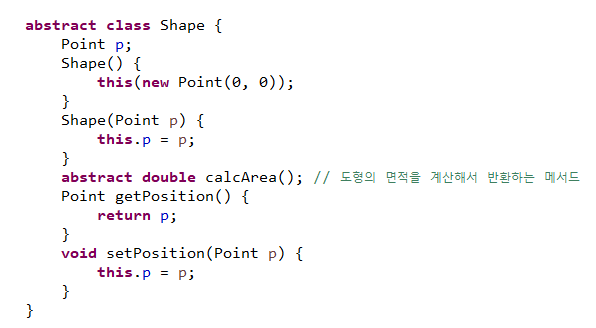
3. 도형을 정의한 Shape클래스를 조상으로 하는 Circle, Rectangle클래스를 작성하시오.
· 참고: 생성자도 각 클래스에 맞게 적절히 추가할 것!
· 작성
|
1
2
3
4
5
6
7
8
9
10
11
12
13
14
15
|
class Point {
int x;
int y;
Point() {
this(0, 0);
}
Point(int x, int y) {
this.x = x;
this.y = y;
}
public String toString() {
return "{" + x + "," + y + "]";
}
}
|
cs |
|
1
2
3
4
5
6
7
8
9
10
11
12
13
14
|
class Circle extends Shape {
double r;
Circle(double r) {
this(new Point(0, 0), r);
}
Circle(Point p, double r) {
super(p);
this.r = r;
}
double calcArea() {
return r * r * Math.PI;
}
}
|
cs |
|
1
2
3
4
5
6
7
8
9
10
11
12
13
14
15
16
17
18
19
20
21
22
|
class Rectangle extends Shape {
double width;
double height;
Rectangle(double width, double height) {
this(new Point(0, 0), width, height);
}
Rectangle(Point p, double width, double height) {
super(p);
this.width = width;
this.height = height;
}
double calcArea() {
return width * height;
}
boolean isSquare() {
if (width == height) {
return true;
} else
return false;
}
}
|
cs |
4. 3번에서 정의한 클래스들의 면적을 구하는 메소드를 작성하고 테스트 하시오.
· 작성
|
1
2
3
4
5
6
7
8
9
10
11
12
13
14
|
class Test {
static double sumArea(Shape[] arr) {
double sum = 0;
for(int i = 0; i < arr.length; i++)
sum += arr[i].calcArea();
return sum;
}
public static void main(String[] args) {
Shape[] arr = {new Circle(5, 0), new Rectangle(3, 4), new Circle(1)};
System.out.print("면적의 합: " + sumArea(arr));;
}
}
|
cs |
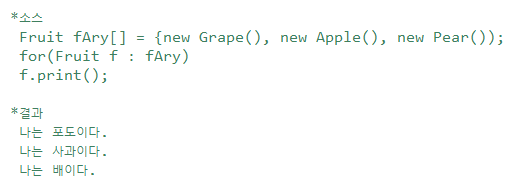
5. 과일, 사과, 배, 포도를 표현한 클래스를 작성하여라.
이들 간의 관계를 고려하여 하나의 추상클래스를 만들어
메소드 print()를 구현하고 다음을 참고하여 같은 결과가 나오도록 클래스를 작성하시오.
· 참고
· 작성
|
1
2
3
4
5
6
7
8
9
10
11
12
13
14
15
16
17
18
19
20
21
22
23
|
abstract class Fruit{
abstract void print();
}
class Grape extends Fruit{
@Override
public void print() {
System.out.println("나는 포도이다.");
}
}
class Apple extends Fruit{
@Override
public void print() {
System.out.println("나는 사과이다.");
}
}
class Pear extends Fruit{
@Override
public void print() {
System.out.println("나는 배이다.");
}
}
|
cs |
|
1
2
3
4
5
6
7
|
class Fruitmain {
public static void main(String[] args) {
Fruit fAry[] = {new Grape(), new Apple(), new Pear()};
for(Fruit f : fAry)
f.print();
}
}
|
cs |
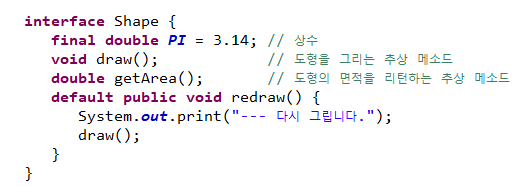
6. 다음은 도형의 구성을 묘사하는 인터페이스이다.
· 아래 Shape interface와 main() 함수를 참고하여, Shape을 구현한 클래스 Circle를 작성하라.
· 참고

· 작성
|
1
2
3
4
5
6
7
8
9
10
11
12
13
14
|
class Circle implements Shape{
private double radius;
public Circle(double radius){
this.radius = radius;
}
public void draw() {
}
public double getArea() {
return radius * radius * PI;
}
public void redraw() {
}
}
|
cs |
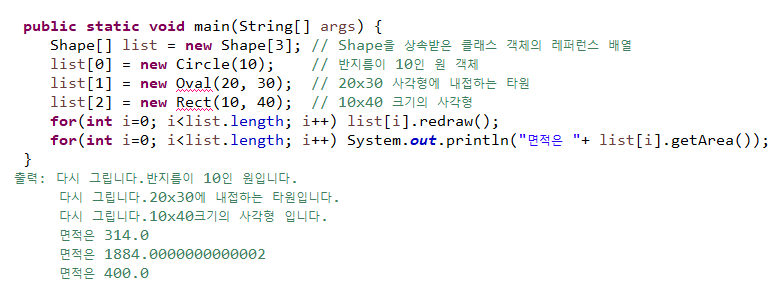
7. 문제 6의 Shape를 구현한 클래스 Oval, Rect를 추가 작성하고 전체 프로그램을 완성하라.
· 참고: main() 메소드와 실행 결과
· 작성
|
1
2
3
4
5
6
7
8
9
10
11
12
13
14
15
16
17
|
class Oval implements Shape{
private int width;
private int height;
public Oval(int width, int height){
this.width = width;
this.height = height;
}
@Override
public void draw() {
System.out.println(width + "x" + height + "에 내접하는 타원입니다.");
}
@Override
public double getArea() {
return width * height * PI;
}
}
|
cs |
|
1
2
3
4
5
6
7
8
9
10
11
12
13
14
15
16
17
|
class Rect implements Shape{
private int width;
private int height;
public Rect(int width, int height){
this.width = width;
this.height = height;
}
@Override
public void draw() {
System.out.println(width + "x" + height + " 크기의 사각형 입니다.");
}
@Override
public double getArea() {
return width * height;
}
}
|
cs |
'bitcamp > JAVA' 카테고리의 다른 글
| JVM 메모리모델과 Object 클래스 (0) | 2021.01.25 |
|---|---|
| 예외처리 (0) | 2021.01.21 |
| interface와 추상클래스 (0) | 2021.01.18 |
| 클래스의 상속과 오버라이딩_연습문제 (0) | 2021.01.17 |
| 클래스의 상속과 오버라이딩 (0) | 2021.01.17 |


